 There are many ways to keep track of the changes made by a script. Some examples that can be used are:
- Transcript
- Out-File
- Event Logs
For this Tip of the Week, we’ll look at using Out-File for logging changes. In previous articles we’ve looked at Out-File to be used as a tool for exporting results to files to be examined later.
Example Usage
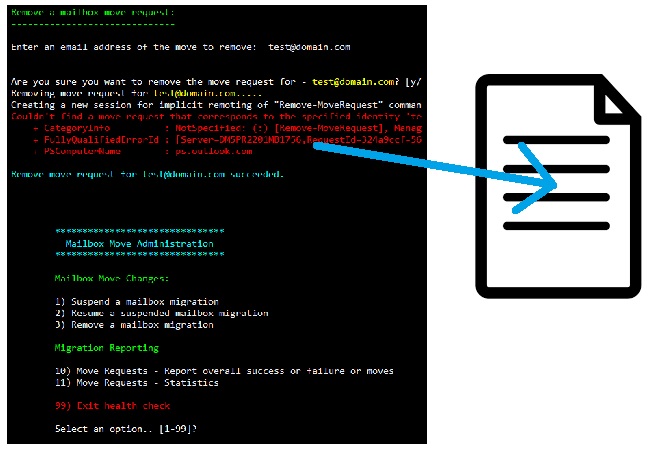
For our first scenario, we’ll use the Out-File cmdlet to record actions of a script used to manage mailbox moves to Office 365. The script was written with many purposes in mind – create mailbox moves, suspend mailbox moves, remove mailbox moves and more. For audit purposes, the IT department would like to keep track of the various actions and when they occurred. We also need to keep track of when the script ended.
First, we need to create the file to be used in logging the changes. Since the file is going to be used multiple times, we need to carefully plan for this file. First, we need to verify if the file exists. IF the file exists, we can move on with the rest of the script. However if it does not exist, we’ll need to create it and add some header information to make the file more meaningful.
First, we need to define a few variables, including the file name, where it is located, as well as the current Date/Time for later logging:
[sourcecode language=”powershell”]
$Date = Get-Date -Format "MM.dd.yyyy-hh.mm-tt"
$Path = (Get-Item -Path ".\" -Verbose).FullName
$FileName = "MailboxMoveAdministrationLogging.txt"
$Destination = $Path+"\"+$FileName
[/sourcecode]
Once that is completed, we can check to see if the file exists:
[sourcecode language=”powershell”]
$FileCheck = Test-Path $Destination
[/sourcecode]
The variable $FileCheck will have two possible values here – $False – the file was not found or $True – file was found at the specified location. Our first line below we check to see if the file is not present ($FileCheck is $False):
[sourcecode language=”powershell”]
If (-not($FileCheck)) {
[/sourcecode]
** Note ** if we wanted to see if the $FileCheck variable were $True instead, we would have used – ‘If ($FileCheck)’. Notice that the -Not was removed from the line.
Next, if the value is false, we need to create it by adding three lines of text for the file’s header:
[sourcecode language=”powershell”]
$Line = "This file logs all changes made to move requests in this script" | Out-File $Destination
$Line = "—————————————————————" | Out-File $Destination -Append
$Line = " " | Out-File $Destination -Append
[/sourcecode]
Next (and this is optional) if the file does exist, we can display this on the screen:
[sourcecode language=”powershell”]
} Else {
Write-host 'Transaction logging file exists!'
}
[/sourcecode]
Now that we have a file, we can use it to keep track of certain results that occur in the file. If you remember from the beginning of the example, the script will handle mailbox move administration. This means we need to log when a migration is created, suspended, resumed or removed from Exchange Online. The events call all be logged in a similar fashion.
For each of the actions, we can check for success or failure using Try {} Catch {} to delineate the events. If the cmdlet succeeds, then a successful messages is logged (Out-File) and if it fails, the Catch code section is executed which logs a failure message. Because we need to keep close tabs on code execution in case we want to use the logs for troubleshooting, each message that is written to the file is also prefaced by a Date:
[sourcecode language=”powershell”]
Try {
$Suspend = Suspend-MoveRequest $SMTPAddress -ErrorAction STOP
$Line = "$Date,Suspend request for $SMTPAddress succeeded." | Out-File $Destination -Append
} Catch {
$Line = "$Date,Suspend request for $SMTPAddress failed." | Out-File $Destination -Append
}
[/sourcecode]
This is a repeatable block of code, so for example, we want to log the removals of mailbox moves, we simply replace the cmdlets, but the large chunk of code remains:
[sourcecode language=”powershell”]
Try {
$Suspend = Remove-MoveRequest $SMTPAddress -ErrorAction STOP
$Line = "$Date,Suspend request for $SMTPAddress succeeded." | Out-File $Destination -Append
} Catch {
$Line = "$Date,Suspend request for $SMTPAddress failed." | Out-File $Destination -Append
}
[/sourcecode]
For the last item to track with the file, we should put in some sort of separator to indicate when the script was ended. This would then allow us to know when scripts were exited (no events to track after a certain time.
[sourcecode language=”powershell”]
$Line = "" | Out-File $Destination -Append
$Line = "—- END @ $Date —-" | Out-File $Destination -Append
$Line = "" | Out-File $Destination -Append
[/sourcecode]
Additionally if we would like to log the start of the PowerShell script, we would added these lines to the top of the script:
[sourcecode language=”powershell”]
$Line = "" | Out-File $Destination -Append
$Line = "—- START @ $Date —-" | Out-File $Destination -Append
$Line = "" | Out-File $Destination -Append
[/sourcecode]
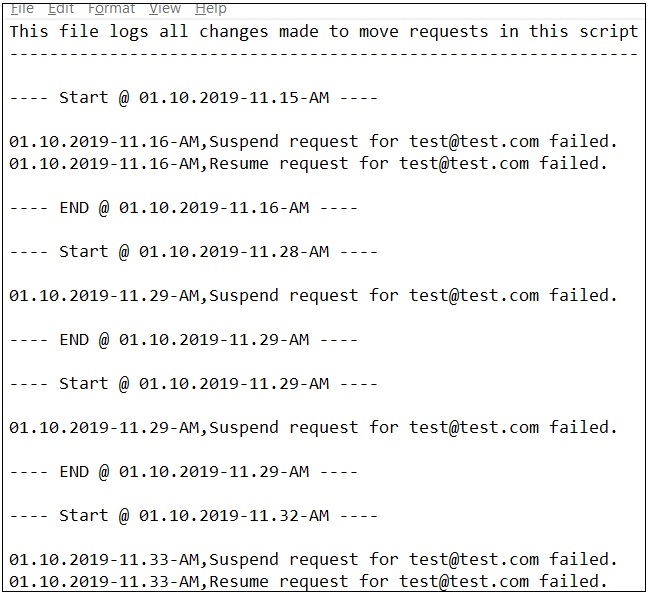
Sample output for a file like this would look like the below sample log:
Conclusion
Remember, the keys to a successful logging file are as follows:
(1) Append all data, do not forget to use the -Append switch or your file may be overwritten.
(2) Log date and time for easy reviewing of an actions timeline.
(3) Name the log file something easy to remember.
(4) Add email notifications using the log file as an attachment if necessary.